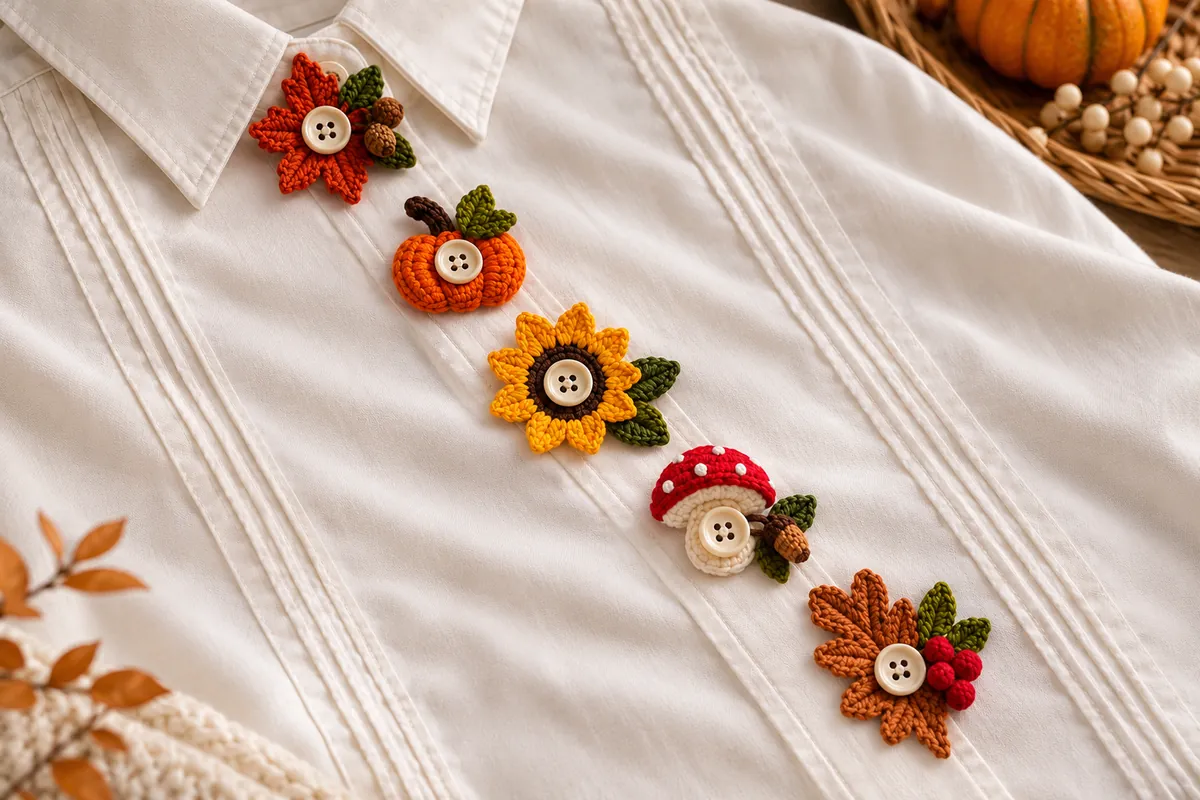
Turn a plain shirt into an autumn outfit with five little crochet button surrounds. A rust leaf, orange pumpkin, golden sunflower, spotted mushroom, and oak leaf with berries bring woodland colors to the button line. Each motif has an open center that slips over an existing garment button, leaving the button visible.
Pattern status. These are original design drafts inspired by the supplied reference image. They have not been test crocheted. The written stitch counts have been checked, but finished measurements, button fit, and yarn usage still need verification on a physical sample. The AI-generated images illustrate the intended style.
Jump to the Five Crochet Patterns ↓
Before You Start
Make the center ring first and test it on the actual shirt button before adding a motif. This ring provides the attachment, so its opening must stretch over the button and settle beneath its rim. Keep the decorative leaves and berries outside that opening.
The shirt stays buttoned in its usual way. After fastening it, slip a motif over the exposed button. Remove the motifs before unbuttoning or washing the shirt. For display samples, a loose button can be passed through the hole to show the intended appearance.
| Detail | Pattern information |
|---|---|
| Skill level | Confident beginner to intermediate, including small rounds, short chains, and sewing miniature details. |
| Terminology | US crochet terms. |
| Included designs | Five removable button surrounds. |
| Construction | Open center ring with flat crochet decoration. Acorns and berries are separate small pieces. |
| Planning size | Approximately 3–5 cm / 1¼–2 in across, depending on motif and yarn. These estimates have not been measured. |
| Gauge | No fixed stitch gauge. The essential fit check is the center ring on your actual button. |
Materials and Tools
- Fine cotton yarn or size 3 crochet thread in rust, orange, golden yellow, dark brown, olive green, red, cream, and tan. Keep the yarn weight consistent.
- A 2 mm hook as a starting point, adjusted for your thread and tension.
- A fine tapestry needle, scissors, removable marker, ruler, and the shirt or a matching button for fitting.
- Optional matching sewing thread for attaching the tiny decorations neatly.
Small leftovers should be enough to explore the designs, but measured yarn quantities are not available. Make the common ring before buying a full palette. A button with very little space beneath its edge may not accommodate the crochet thickness.
Abbreviations and Pattern Notes
| Abbreviation | US term |
|---|---|
| ch | Chain |
| sl st | Slip stitch |
| sc | Single crochet |
| hdc | Half double crochet |
| dc | Double crochet |
| inc | 2 sc in the next stitch |
| dec | Single crochet the next 2 stitches together |
| MR | Magic ring, used only for the small solid decorations |
| st / sts | Stitch / stitches |
Starting chains and joining slip stitches do not count as stitches unless stated. Join round-worked rings with a sl st into their first sc. For flat rows, ch 1 and turn between rows. The turning chain does not count.
Shared Green Leaf
Ch 6. Starting in the second ch from the hook, work sc, hdc, dc, hdc, sc across the five available chains. Fasten off with a sewing tail. This narrow, flat leaf has five return stitches. Make as many as each design specifies.
Shared Chain Lobe
A lobe grows outward from a ring and returns along one side of its own chain. For a lobe of length L, ch L. Starting in the second chain from the hook, work 1 sc, then hdc in each chain until one chain remains, then 1 sc in that last chain. You have L minus 1 return stitches. Work only one side of the chain, then anchor it to the ring as directed.
| Chain length | Return stitches | Return sequence |
|---|---|---|
| 4 | 3 | sc, hdc, sc |
| 5 | 4 | sc, 2 hdc, sc |
| 6 | 5 | sc, 3 hdc, sc |
| 7 | 6 | sc, 4 hdc, sc |
| 8 | 7 | sc, 5 hdc, sc |
| 9 | 8 | sc, 6 hdc, sc |
| 10 | 9 | sc, 7 hdc, sc |
Five Autumn Crochet Button Cover Patterns
Common Center Ring and Button Fit
- Ch 8 and sl st to the first chain to form a ring. Check that the chain is untwisted.
- Ch 1 and work 16 sc into the ring space, crocheting around the chains rather than into individual chain tops. Join to the first sc. You have 16 sc.
- Fasten off temporarily and test the ring over a button on the fastened shirt. It should pass over the button with gentle stretching and settle beneath the edge without immediately slipping off.
If the ring will not pass over the button, remake it with one or two additional starting chains. If it falls off, try one or two fewer chains. Keep 16 sc around the adjusted ring for Designs 1, 3, 4, and 5. If those stitches crowd or pull the ring out of shape, choose finer yarn and remake the fit sample before proceeding. Recheck the fit after adding every motif, since decoration can change the opening.
A magic ring drawn closed would remove the buttonhole. Use a chain ring for the wearable base and keep the center open throughout assembly.
1. Rust Autumn Leaf with Acorns
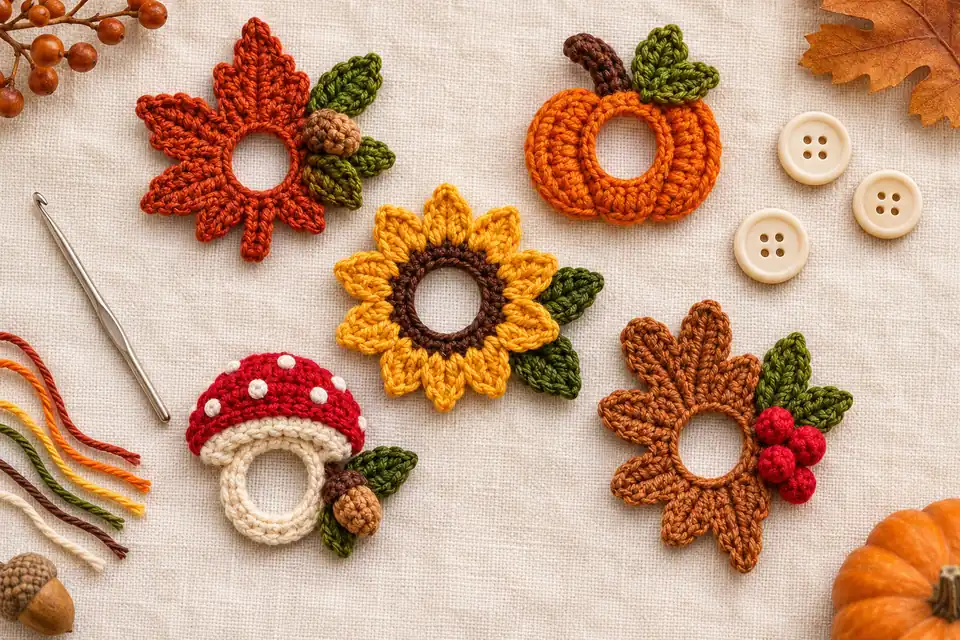
Make the common 16-sc ring in rust. Mark its stitches 1–16 around the edge. Join rust to stitch 1 and make five lobes with chain lengths 5, 7, 9, 7, and 5, respectively.
- Sl st in stitch 1, make the ch-5 lobe, sl st in stitch 2, then sl st in stitch 3.
- Sl st in stitch 4, make the ch-7 lobe, sl st in stitch 5, then sl st in stitch 6.
- Sl st in stitch 7, make the ch-9 lobe, sl st in stitch 8, then sl st in stitch 9.
- Sl st in stitch 10, make the ch-7 lobe, sl st in stitch 11, then sl st in stitch 12.
- Sl st in stitch 13, make the ch-5 lobe, sl st in stitch 14, then sl st in stitch 15.
- Sl st in stitch 16, ch 4, and sl st back along the three available chains. Sl st to stitch 16 again and fasten off.
Arrange the longest lobe at the top and the short stem below the buttonhole. Make one shared green leaf and two small acorns.
Small acorn, make 2. In tan, work 4 sc in an MR. Work 4 sc in the next round. Change to dark brown and work (sc, inc) twice for 6 sc. Fasten off. Draw the six remaining front loops together to close the top. Leave unstuffed. Sew the green leaf and acorns to the outer right edge of the rust ring, clear of the center hole.
2. Orange Pumpkin
Make the common center ring in orange. For the next round, work (sc, inc) eight times and join to the first sc. You have 24 sc. For the final round, work sc in each of the 24 sts and join. Fasten off. This creates a flat pumpkin surround with a visible central buttonhole.
Set the ring on a flat surface and choose a top point. With a separate orange strand, embroider three short, slightly curved vertical ribs across the outer band, spacing them around the central opening. Catch only the crochet fabric and leave the hole unobstructed.
Stem. Join dark brown at the chosen top edge, ch 5, and sl st back along the four available chains. Sl st to the same edge stitch and fasten off. Make two shared green leaves and sew their bases beside the stem. Allow the pumpkin to stay softly rounded without pulling the ribs tight.
3. Golden Sunflower
Make the common 16-sc ring in dark brown and fasten off. Join golden yellow to any sc. Each petal uses two ring stitches.
For a petal, sl st into the next unused ring stitch, ch 4, then work sc in the second chain from the hook, hdc in the next chain, and dc in the final chain. Sl st into the following ring stitch. Repeat this complete petal sequence eight times in total around the 16 ring stitches. Fasten off. Each petal has three return stitches and the sunflower has eight petals.
Make two shared green leaves. Sew their bases to the back of the brown outer edge, angling one to the side and one downward. Keep their tails and attachment stitches outside the button opening.
4. Red Spotted Mushroom
Make the common 16-sc ring in cream for the open stem surround. Set it aside while making the cap.
| Row | Instructions | Count |
|---|---|---|
| 1 | Ch 11. Starting in the second chain from the hook, sc across. | 10 sc |
| 2 | Sc in each st. | 10 sc |
| 3 | Dec, 6 sc, dec. | 8 sc |
| 4 | Dec, 4 sc, dec. | 6 sc |
| 5 | Dec, 2 sc, dec. | 4 sc |
Fasten off. Hold the broad foundation edge at the bottom. Join cream at one end of that edge and work one sl st into each of the ten unused foundation-chain loops. Fasten off. Embroider several small cream spots on the red area.
Position the cap immediately above the cream ring. Sew only the middle section of the cap’s lower edge to the top outer arc of the ring, leaving the center opening entirely visible. Make one shared green leaf and one small acorn from Design 1. Attach them at the side of the ring below the cap.
5. Oak Leaf with Red Berries
Make the common 16-sc ring in warm brown. Number its stitches 1–16. The leaf has seven lobes of chain lengths 4, 6, 8, 10, 8, 6, and 4.
For the first lobe, sl st into stitch 1, make the ch-4 lobe, and sl st into stitch 2. For the next lobe, sl st into stitch 3, make the ch-6 lobe, and sl st into stitch 4. Continue the same two-stitch method across stitches 5–14, using the remaining chain lengths in order. You have seven lobes anchored across fourteen ring stitches.
Sl st into stitch 15, ch 5, and sl st back along the four available chains to form the stem. Sl st into stitch 16 and fasten off. Arrange the long ch-10 lobe at the top and the stem at the bottom. The ring remains the center of this stylized lobed leaf.
Berries, make 3. With red, work 5 sc in an MR. Tighten the starting ring, fasten off, and pass the tail through the front loops of the five sc. Draw them together into a tiny unstuffed bead. Secure the tail.
Make two shared green leaves. Sew the leaves and berries to the outer side of the brown ring in a small cluster. Stitch each berry independently through its base so the cluster stays secure while the buttonhole remains clear.
Assembly and Wearing
Secure the Small Details
Lay each motif flat and arrange its decoration before sewing. Catch several stitches at each leaf base and pass through each acorn or berry base more than once. Weave tails through the dense outer stitches on the back, changing direction before trimming. Do not bridge the center hole with yarn.
Fit the Motifs to the Shirt
- Fasten the shirt normally.
- Hold a motif against the button, tilt the button slightly, and ease its rim through the center opening one side at a time.
- Settle the crochet under the button rim and turn the motif upright.
- Move your arms and check that it stays in place without pulling the shirt fabric.
- Remove and refit any motif that is loose, crowded, or uncomfortable at the collar.
The photographed order can be echoed with the rust leaf near the collar, followed by the pumpkin, sunflower, mushroom, and oak leaf. If the motifs touch each other, use alternate buttons or make them in finer thread. Leave the collar button undecorated if the added thickness feels restrictive.
Troubleshooting
| Issue | Adjustment |
|---|---|
| The motif slips off. | Remake the foundation with fewer chains and repeat the fit check on the actual fastened garment. |
| The button will not pass through. | Increase the foundation by one chain at a time or use finer yarn. Avoid forcing the garment button through a tight opening. |
| The center ring curls. | Check whether sixteen sc crowd the opening. Try finer yarn and keep the working tension relaxed. |
| A lobe twists. | Confirm that you worked back along one side of its chain and anchored it in the specified next ring stitch. |
| The sunflower has fewer than eight petals. | Count two base stitches per petal. Keep starting chains and joining slips out of the sixteen-stitch base count. |
| The mushroom blocks the button. | Raise the cap and resew it to the upper outer arc of the cream ring. |
Care and Variations
Remove all surrounds before washing the shirt. Hand-clean the crochet according to the yarn label, reshape gently, and dry flat. Test dark red and rust yarn for color transfer before wearing the motifs against white fabric.
For a quieter palette, combine oatmeal, olive, and chestnut. A single sunflower also works as a small cardigan accent. Check the fit again when changing garment buttons, yarn thickness, or hook size. These removable small pieces are intended as adult clothing accessories and should be kept away from young children.
Frequently Asked Questions
Do I sew new buttons onto the shirt?
The surrounds are designed to fit over existing buttons after the shirt is fastened. The visible cream centers are the garment buttons.
Can I use a magic ring for the center?
Use the open chain-ring base for the removable motifs. A tightly closed magic ring is suitable for the small acorns and berries.
Will these fit every button?
The fit depends on button diameter, thickness, clearance, yarn, and tension. Make a ring sample on the intended garment before crocheting the decoration.
Can I use thicker yarn?
Thicker yarn will make larger motifs and a thicker attachment ring. Fine cotton is more practical for the small buttons shown in the reference style.
Are these the original patterns from the photo?
These are independently drafted interpretations of the five visible motifs. The image does not establish its original stitch counts or construction, and these drafts still need physical testing.