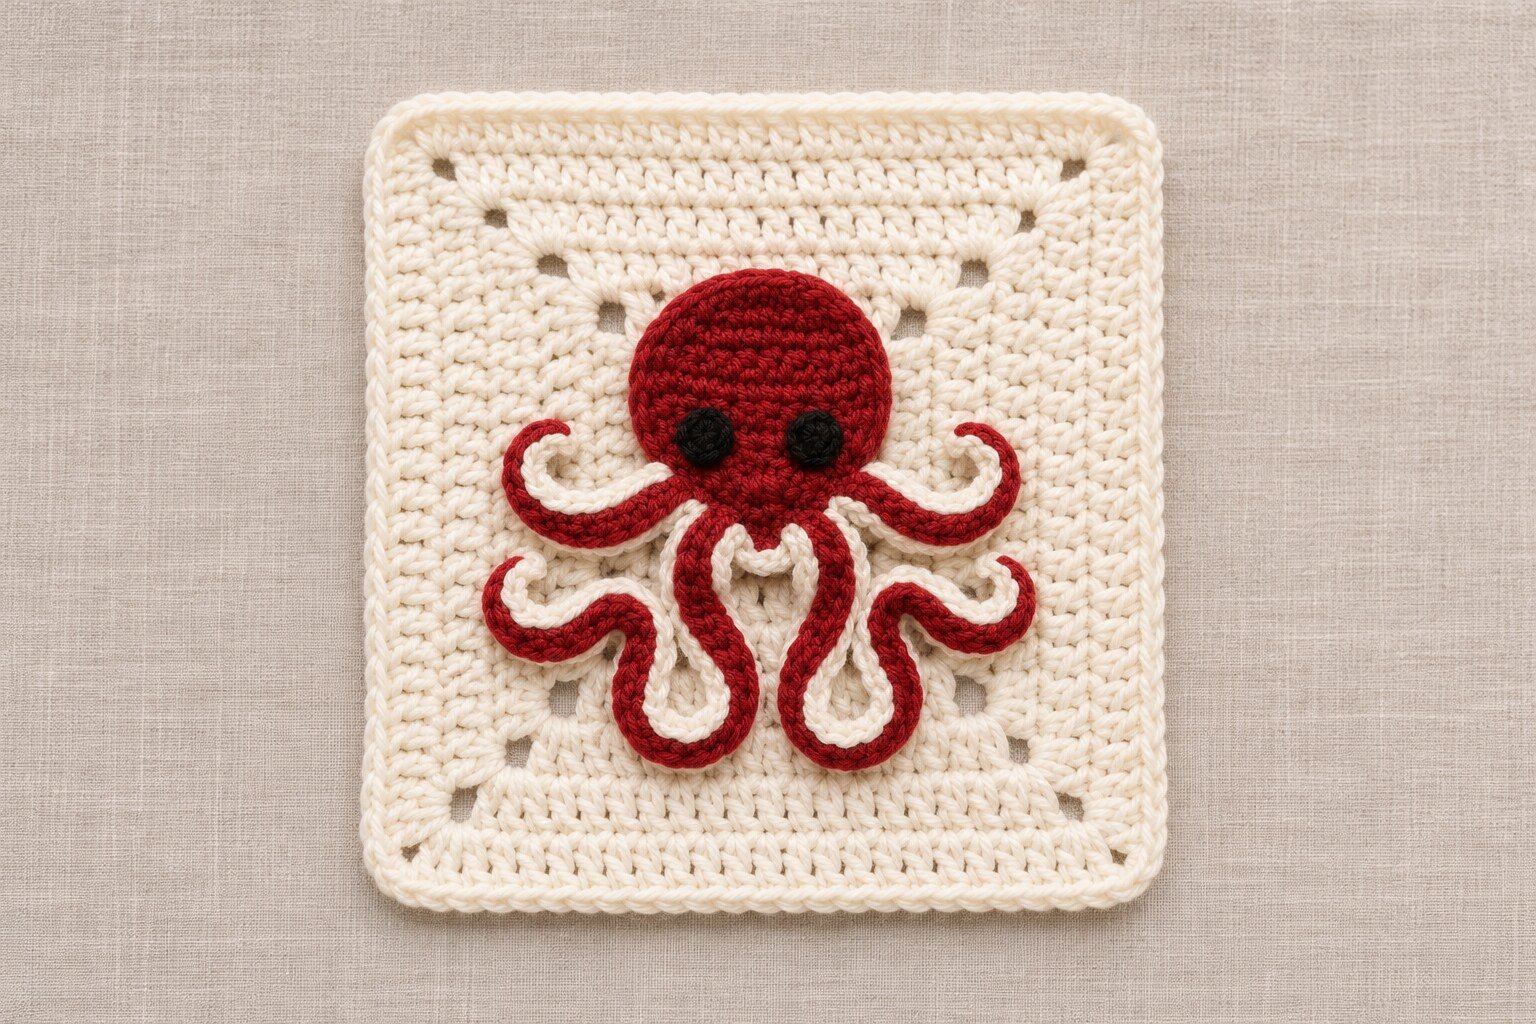

A red crochet octopus with curled arms sits on a solid ivory granny square. The square and appliqué are made separately, so you can block the background first and arrange the arms before sewing. Use the finished square as a panel for an ocean-themed blanket or stitch the motif onto a pocket or cushion.
Pattern status. This pattern was drafted from the supplied design reference and has yet to be test crocheted. The cover is an AI-generated illustration of the intended look. The diagram shows the arm placement used in the written pattern.
Jump to the free crochet pattern ↓
Project Overview
| Detail | Pattern information |
|---|---|
| Skill level | Confident beginner comfortable with joined rounds and sewing an appliqué |
| Terminology | US crochet terms |
| Construction | Six-round solid granny square, one flat head, eight arms in four pairs, and two embroidered eyes |
| Finished size | Depends on yarn, hook, and tension. The six-round square has 23 dc along each side between the corner spaces. Finished dimensions have yet to be measured. |
| Gauge | No fixed gauge. Use the same yarn weight for the square and appliqué. For a blanket, block and measure one square before making the rest. |
Materials and Tools
- DK cotton yarn in ivory for the square and arm edging, red for the octopus, and a small amount of black for the eyes.
- A 3.5 mm crochet hook as a starting point, a blunt yarn needle, scissors, and removable stitch markers.
- Optional blocking mat and rustproof pins.
Choose a hook that gives you a square with enough drape for your project. If the appliqué fabric is looser than you want, use a slightly smaller hook for the head and arms, then check that they still fit on the square before sewing.
Abbreviations and Pattern Notes
| Abbreviation | Meaning |
|---|---|
| MR | Magic ring |
| ch | Chain |
| sl st | Slip stitch |
| sc | Single crochet |
| dc | Double crochet |
| inc | Work 2 sc in the same stitch |
| ch-2 sp | Chain-2 space |
| Rnd / Rnds | Round / rounds |
| st / sts | Stitch / stitches |
The beginning ch 3 counts as one dc in the granny square. The four corner spaces and all joining slip stitches are excluded from the dc totals. Work the head in a spiral and move a marker to the first stitch of each round.
Free Crochet Octopus Granny Square Pattern
1. Crochet the Ivory Solid Granny Square
Rnd 1. With ivory, make an MR. Ch 3, work 2 dc into the ring, then work [ch 2, 3 dc into the ring] three times. Ch 2 and join with a sl st to the top of the beginning ch 3. Close the ring. (12 dc and 4 ch-2 corner spaces)
Rnds 2–6. Sl st across the dc before the first ch-2 corner space, then sl st into that space. You will cross two dc at the start of Rnd 2 and one dc at the start of each later round. In that space work [ch 3, dc, ch 2, 2 dc]. Dc in each dc along the next side. At the next corner work [2 dc, ch 2, 2 dc] in the ch-2 space. Repeat the side and corner instructions until you have made the remaining three corners. Dc in each dc along the last side, then join with a sl st to the top of the beginning ch 3.
| Round | Dc between corner spaces on each side | Total dc |
|---|---|---|
| 1 | 3 | 12 |
| 2 | 7 | 28 |
| 3 | 11 | 44 |
| 4 | 15 | 60 |
| 5 | 19 | 76 |
| 6 | 23 | 92 |
Fasten off and weave in the ends. Shape the square flat, then let it dry completely if you wet-block it. For a larger panel, continue the same corner repeat until the square has the width you need.
2. Crochet the Red Octopus Head
- Rnd 1. With red, work 6 sc in MR. (6)
- Rnd 2. Inc in each st. (12)
- Rnd 3. [Sc, inc] six times. (18)
- Rnd 4. [2 sc, inc] six times. (24)
- Rnd 5. [3 sc, inc] six times. (30)
Sl st into the next stitch to smooth the edge and fasten off with a long tail for sewing. Choose the side you want to face up. Mark the eyes on the lower half of the circle, about four stitches apart. With black yarn, make several short satin stitches at each mark to form a round eye. Secure the black ends on the reverse.
3. Crochet Eight Arms
Make two arms of each length in red. Work from the tip toward the base, starting in the second chain from the hook. The increases at the tip encourage the curve. The straight section gives you room to pin a longer bend when you assemble the motif.
| Arm pair | Starting chain | Work into the chains | Red stitch count |
|---|---|---|---|
| Short, tucked behind the head | Ch 7 | Inc in the first 2 usable chains, then sc in the next 4. | 8 |
| Upper side curls | Ch 12 | Inc in the first 3 usable chains, then sc in the next 8. | 14 |
| Lower side curls | Ch 15 | Inc in the first 4 usable chains, then sc in the next 10. | 18 |
| Long center curls | Ch 19 | Inc in the first 5 usable chains, then sc in the next 13. | 23 |
Fasten off each arm with a red tail at the base. For the ivory edge, join ivory at the tip in the first unused foundation loop. Sl st loosely into one unused loop of each remaining worked chain position toward the base. There are 6, 11, 14, or 18 ivory slip stitches per arm, including the joining stitch, depending on the length. Fasten off and weave in the ivory ends. Keep the slip stitches loose enough that you can shape the arm by hand.
How to Assemble the Octopus Granny Square

- Position the head. Lay the blocked square right side up. Pin the head on the vertical centerline with its center about one-third of the way down the square. Leave space below it for the longest curls.
- Arrange all eight arms. Tuck the two short arms under the lower edge of the head, with their tips peeking out between the longer arms. Place one upper curl at each lower side of the head, turning its tip upward. Put the lower side curls slightly below those and angle them outward. Let the two longest arms hang toward the bottom, with their tips curling back up. Flip or rotate each piece as needed for a mirrored layout.
- Sew the arms first. Lift the head and sew the arm bases to the square with their red tails. Add small matching stitches at each tight bend and near the tip to hold the shape. Keep the outer round free if you plan to join this square to others.
- Attach the head. Set the head back over the bases. Whipstitch through its outer loops and the upper strands of the ivory square. Keep the tension relaxed so the head lies flat. Bury the tails on the reverse.

Troubleshooting
| If you notice | Try this |
|---|---|
| The square has uneven sides | Count the dc between corner spaces and check for two dc on each side of every corner space. |
| The arms twist too tightly | Check the ivory edging first. Rework tight slip stitches loosely, then pin the curl into shape. |
| The long arms reach the border | Pin a deeper bend or move the head up slightly. If needed, work one extra square round before assembling. |
| The square puckers around the appliqué | Loosen the sewing stitches and use small tacks at the bends instead of pulling a long thread across the back. |
Variations and Care
Try a coral octopus on pale blue, or make several ivory squares with octopuses in different shades of red. If you are joining them into a blanket, block the squares to the same measurements and leave each corner space accessible.
Follow the yarn label for washing. After washing, gently arrange the curled arms and square corners, then lay the piece flat to dry.
Frequently Asked Questions
Can I attach the octopus to something other than a granny square?
Yes. Sew the head and arms to a firm crochet panel, a fabric pocket, or a cushion front. Pin the full shape first to check that the curled arms fit.
Can I use worsted-weight yarn?
Yes. Choose a hook that suits your yarn, expect a larger square, and use the same yarn weight for the background and the motif to keep their proportions close.
Can I omit the cream arm edging?
Yes. Leave the red arms untrimmed and pin them into mirrored curls before sewing.