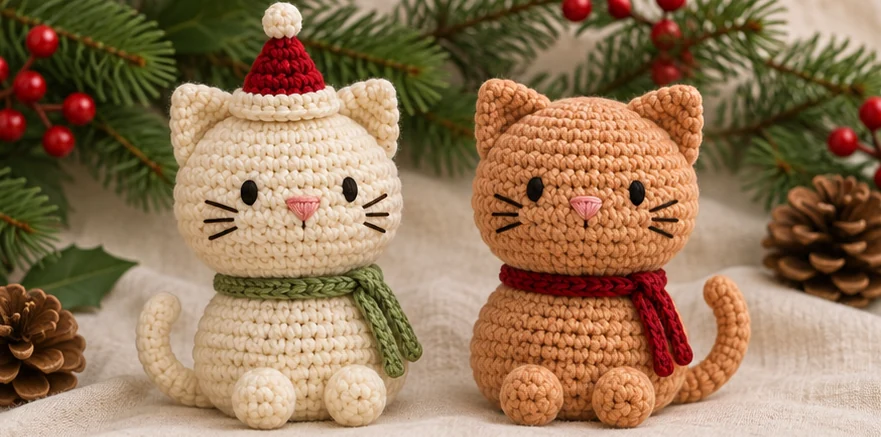
A curled tail, embroidered whiskers and a tiny Santa hat turn this seated crochet kitten into a Christmas decoration. Make a cream cat with a sage scarf, or pair it with a ginger kitten in cranberry red. Both versions use the same instructions for the cat, scarf and hat.
Jump to the Pattern · Jump to Assembly
Pattern status: This original pattern draft has been checked for stitch counts. It has not been test crocheted. The images are AI-generated illustrations of the intended design.
Project at a Glance
| Skill level | Confident beginner familiar with basic amigurumi shaping and sewing |
|---|---|
| Crochet terms | US terminology |
| Construction | Separate stuffed head and body, flat ears, two front paws and a curved tail |
| Estimated size | About 11–14 cm (4¼–5½ in) seated, excluding the hat. Yarn, tension and stuffing affect the result. |
Materials and Gauge
- DK cotton or cotton-blend yarn in cream or ginger for the kitten. Use small amounts of cranberry, sage and ivory for the accessories.
- 2.75 mm crochet hook as a starting point, plus a removable stitch marker, yarn needle and scissors.
- Fiberfill and embroidery thread in black or dark brown for the eyes and whiskers, plus pink for the nose.
Gauge check: Work the first five rounds of the head. Gently bend the fabric over a little fiberfill. If the filling shows through the stitches, try a smaller hook. If the stitches are hard to enter, try a slightly larger hook and check the fabric again.
Abbreviations and Working Notes
- MR magic ring · ch chain · sc single crochet · sl st slip stitch · st(s) stitch(es) · rnd round.
- inc two sc in one st. dec invisible decrease. Insert the hook through the front loop of each of the next two stitches, yarn over and pull through both front loops, then yarn over and pull through the two loops on the hook.
- sc2tog pull up a loop in each of the next two stitches, then yarn over and draw through all three loops. sc3tog pull up a loop in each of the next three stitches, then yarn over and draw through all four loops.
Work the stuffed pieces, tail and hat in continuous rounds. Mark the first stitch of each round and move the marker as you go. Work the ears and scarf in rows. Turning chains do not count as stitches. Parentheses give the stitch count at the end of a round or row.
Free Christmas Kitty Amigurumi Pattern
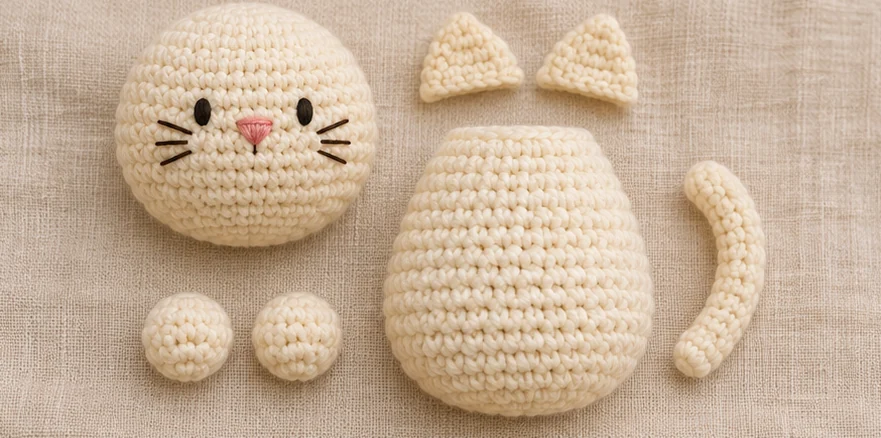
Head
- Rnd 1: 6 sc in an MR (6).
- Rnd 2: Inc around (12).
- Rnd 3: Repeat (sc, inc) six times (18).
- Rnd 4: Repeat (2 sc, inc) six times (24).
- Rnd 5: Repeat (3 sc, inc) six times (30).
- Rnd 6: Repeat (4 sc, inc) six times (36).
- Rnd 7: Repeat (5 sc, inc) six times (42).
- Rnds 8–13: Sc around (42 each round).
- Rnd 14: Repeat (5 sc, dec) six times (36).
- Rnd 15: Repeat (4 sc, dec) six times (30).
- Rnd 16: Repeat (3 sc, dec) six times (24). Pause here to embroider the face.
- Rnd 17: Repeat (2 sc, dec) six times (18). Stuff the head evenly.
- Rnd 18: Repeat (sc, dec) six times (12). Add a little more filling if needed.
- Rnd 19: Dec six times (6). Cut the yarn, thread it through the six front loops and pull the opening closed. Weave in the end.
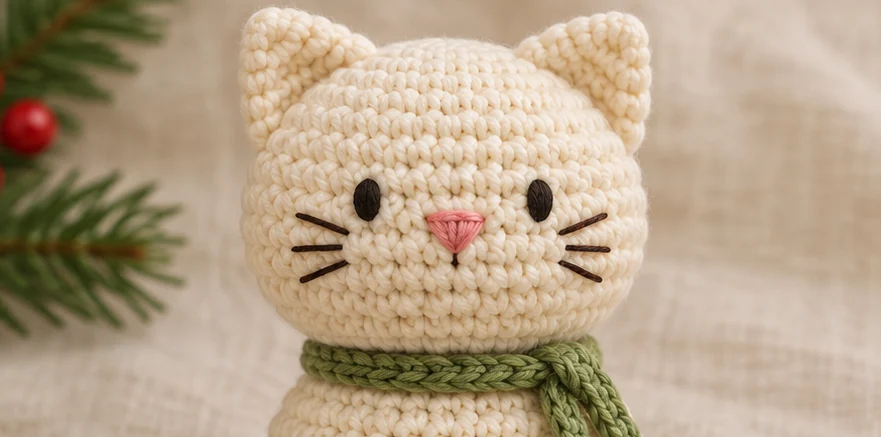
Embroider the face after Rnd 16. Mark the middle of the face first. Place the eyes across Rnds 10–11, leaving about seven stitches between their inner edges. Use two or three small black stitches per eye. Center the pink triangle nose around Rnd 12. Add a short downward stitch below the nose and three fine whiskers on each cheek. Secure the thread ends inside before stuffing.
Seated Body
Start from the base in the same color as the head.
- Rnd 1: 6 sc in an MR (6).
- Rnd 2: Inc around (12).
- Rnd 3: Repeat (sc, inc) six times (18).
- Rnd 4: Repeat (2 sc, inc) six times (24).
- Rnd 5: Repeat (3 sc, inc) six times (30).
- Rnd 6: Repeat (4 sc, inc) six times (36).
- Rnds 7–9: Sc around (36 each round).
- Rnd 10: Repeat (4 sc, dec) six times (30).
- Rnds 11–12: Sc around (30 each round).
- Rnd 13: Repeat (3 sc, dec) six times (24).
- Rnd 14: Sc around (24).
- Rnd 15: Repeat (2 sc, dec) six times (18).
- Rnd 16: Sc around (18). Fasten off with a long sewing tail and leave the neck open. Stuff the body, smoothing the base against a flat surface.
Flat Triangle Ears · Make 2
- Row 1: Ch 8. Sc in the second ch from the hook and in each ch across (7).
- Row 2: Ch 1, turn. Sc2tog, sc in the next three sts, sc2tog (5).
- Row 3: Ch 1, turn. Sc2tog, sc, sc2tog (3).
- Row 4: Ch 1, turn. Sc3tog over all three sts (1). Fasten off, leaving a tail. Thread the tail down one side to the wide base before sewing.
For a touch of color, embroider a small pink V inside each triangle before attaching it.
Front Paws · Make 2
- Rnd 1: 6 sc in an MR (6).
- Rnd 2: Inc around (12).
- Rnds 3–5: Sc around (12 each round).
- Rnd 6: Repeat (sc, dec) four times (8). Fasten off, leaving a sewing tail. Add a pinch of stuffing to each paw and leave the rim open for sewing.
Tail
- Rnd 1: 6 sc in an MR (6).
- Rnds 2–15: Sc around (6 each round). Fasten off with a sewing tail. Leave the tail unstuffed so it can bend.
Mini Santa Hat
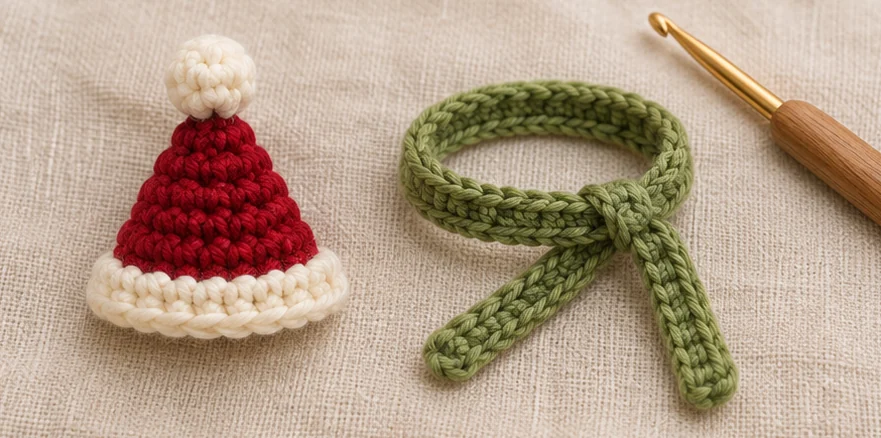
The hat sits between the ears. Work from tip to brim in cranberry.
- Rnd 1: 6 sc in an MR (6).
- Rnd 2: Sc around (6).
- Rnd 3: Repeat (sc, inc) three times (9).
- Rnd 4: Sc around (9).
- Rnd 5: Repeat (2 sc, inc) three times (12).
- Rnd 6: Sc around (12).
- Rnd 7: Repeat (3 sc, inc) three times (15).
- Rnd 8: Sc around (15).
- Rnd 9: Repeat (4 sc, inc) three times (18).
- Rnd 10: Repeat (5 sc, inc) three times (21).
- Rnd 11: Change to ivory. Sc around (21).
- Rnd 12: Sc around (21). Sl st into the next st and fasten off.
Crocheted pompom: In ivory, work 6 sc in an MR (6), inc around (12), sc around (12), then dec six times (6). Close the opening and sew the ball to the tip of the hat.
Narrow Scarf
Ch 41. Starting in the second ch from the hook, sc in each ch across (40). Ch 1, turn, and sc in each st across again (40). Fasten off. Check the length against the stuffed neck before weaving in the ends. To adjust the length, change the starting chain and keep one sc per available chain in the first row.
Assembly and Finishing
- Attach the ears. Flatten both bases and pin them across Rnds 4–7 of the head. View the cat from the front to check their angle and spacing, then sew along each wide base.
- Join the head and body. Center the closed end of the head over the 18-stitch neck opening. Add filling at the neck if there is a hollow. With the body yarn tail, sew all the way around, catching a little of the head fabric for each stitch at the neck.
- Position the paws. Set the kitten on a table and pin the two paws low on the front, roughly across Body Rnds 5–9. Keep their bottoms level with the base and sew around each open rim.
- Curve the tail. Sew the open end to the lower back, around Rnd 6. Bend the tail forward around one side and tack it once to the body with matching yarn.
- Finish the accessories. Cross the scarf ends and tack them to the body for a display piece. Angle the cap between the ears and tack the brim at several points if you want it to stay in place.
Troubleshooting, Variations and Care
- Head wobbles: Add a little more stuffing at the neck and take a second pass around the head-to-body seam.
- Kitten tips forward: Move the paws slightly higher and spread the stuffing evenly across the base.
- Hat sits too high: Check the 21-stitch brim before fastening off. If the fabric is tight, redo the brim with a slightly larger hook.
- Change the palette: Try ginger with a cranberry scarf or cream with sage. Use an extra row of ivory at the hat brim for a wider band.
- Care: Follow the yarn labels. For a small spot, blot it gently with a damp cloth and air-dry the kitten before storing it.
Frequently Asked Questions
Do the two kittens need different instructions?
No. Use the same rounds and assembly placements for both. Change the body and scarf colors to make a matching pair.
Can I make a smaller kitten?
Use a finer yarn with a hook that gives dense stitches. Keep the stitch counts and use lighter embroidery thread for the face.
Can I skip the Santa hat?
Yes. The ear and head assembly stays the same, and the scarf can be worked in any color for a year-round kitten.