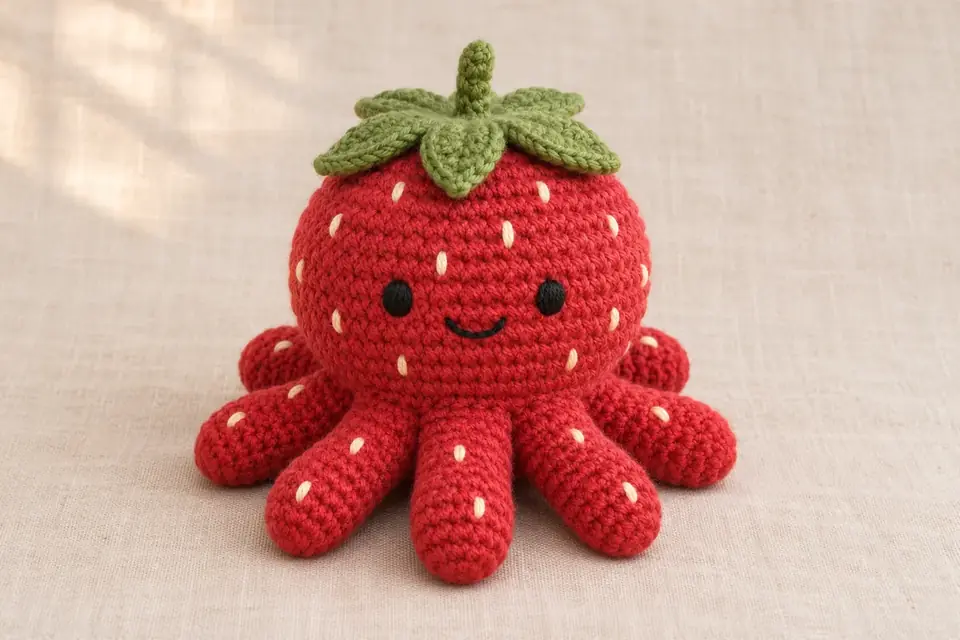

Make a strawberry octopus with a round berry-colored body, eight soft little arms, embroidered seeds, and a green leaf crown. The body and arms use single crochet in continuous rounds, so this free amigurumi pattern is a good next project if you know how to crochet a magic ring, increase, decrease, and sew pieces together.
Strawberry Octopus Pattern at a Glance
| Detail | What to expect |
|---|---|
| Skill level | Confident beginner |
| Terminology | US crochet terms |
| Construction | One stuffed body, eight sewn-on arms, and a separate leaf crown with stem |
| Method | Continuous spiral rounds for the body, arms, and crown base |
| Finished size | Varies with the yarn, hook, and tension. Sample measurements are pending. |
| Gauge | No exact gauge is required. Aim for a firm fabric with small gaps. |
Pattern status: This original draft has been checked for stitch-count consistency and has yet to be test crocheted.
Materials and Tools
| Supply | Suggested option |
|---|---|
| Main yarn | Red or pink DK or light worsted yarn, approximately 40–60 g as a starting estimate |
| Accent yarn | Green for the leaves and stem, white for the seeds, and black for the face |
| Hook | 3.0–3.5 mm as a starting point |
| Stuffing | Polyester fiberfill |
| Tools | Locking stitch marker, yarn needle, scissors, and optional pins |
Choose a hook that makes an even, firm fabric. Lightly stretch the first few rounds under good light. If you see large gaps, try a smaller hook. For the finished size, measure the height from the base to the tip of the stem and the width across the outermost arms.
Abbreviations
| Abbreviation | US meaning |
|---|---|
| MR | Magic ring |
| ch | Chain |
| sc | Single crochet |
| hdc | Half double crochet |
| sl st | Slip stitch |
| inc | Work 2 sc into the same stitch |
| dec | Invisible single crochet decrease over the next 2 stitches |
| st / sts | Stitch / stitches |
Place a marker in the first stitch of each spiral round and move it up as you work. For an invisible decrease, insert the hook through the front loop of each of the next two stitches, yarn over and pull through both front loops, then yarn over and pull through both loops on the hook.
Free Strawberry Octopus Amigurumi Pattern
Part 1. Crochet the Strawberry Body
Use red or pink yarn and begin at the top of the head. Work through Round 14, secure the active loop with a locking stitch marker, and follow the embroidery instructions in Part 4 while the opening is wide. Return here to work Rounds 15–20.
| Round | Instructions | Stitches |
|---|---|---|
| 1 | 6 sc in MR | 6 |
| 2 | Inc in each st | 12 |
| 3 | (1 sc, inc) × 6 | 18 |
| 4 | (2 sc, inc) × 6 | 24 |
| 5 | (3 sc, inc) × 6 | 30 |
| 6 | (4 sc, inc) × 6 | 36 |
| 7 | (5 sc, inc) × 6 | 42 |
| 8–14 | Sc in each st | 42 |
| 15 | (5 sc, dec) × 6 | 36 |
| 16 | (4 sc, dec) × 6 | 30 |
| 17 | (3 sc, dec) × 6 | 24 |
| 18 | (2 sc, dec) × 6 | 18 |
| 19 | (1 sc, dec) × 6 | 12 |
| 20 | Dec around | 6 |
After Round 18, add stuffing in small tufts. Work Round 19, check the shape, and add a little more stuffing through the opening if needed. Work Round 20 and fasten off with a sewing tail. Thread the tail through the front loops of the last six stitches, pull the opening closed, and bury the tail inside the body.
Part 2. Make Eight Octopus Arms
Use the main color for each arm. For a two-tone tip, use white for Round 1 and switch to the main color as you complete the last stitch of that round.
| Round | Instructions | Stitches |
|---|---|---|
| 1 | 6 sc in MR | 6 |
| 2 | (1 sc, inc) × 3 | 9 |
| 3–6 | Sc in each st | 9 |
| 7 | (1 sc, dec) × 3 | 6 |
Fasten off each arm, leaving a long tail for sewing. Keep the six-stitch opening unclosed. Leave the arms unstuffed for a soft shape, or add a tiny tuft near each tip for a fuller look. Make eight arms and line them up to check their length before sewing.
Part 3. Crochet the Leaf Crown and Stem
With green yarn, crochet the crown base in a spiral.
| Round | Instructions | Stitches |
|---|---|---|
| 1 | 6 sc in MR | 6 |
| 2 | Inc in each st | 12 |
| 3 | (1 sc, inc) × 6 | 18 |
Keep the yarn attached. Starting at the first stitch of Round 3, make six leaves around the rim. For each leaf, ch 5. Work a sl st in the second ch from the hook, then 1 sc, 1 hdc, and 1 sc in the remaining three chains. Sl st into the next unused stitch on the crown rim to anchor the leaf. Sl st once into each of the following two rim stitches. Repeat until all 18 rim stitches have been used and you have six leaves. Fasten off with a long sewing tail.
For the stem, ch 5. Starting in the second ch from the hook, sl st across all four remaining chains. Leave a sewing tail and stitch the base of the stem to the center of the crown.
Part 4. Embroider the Face and Strawberry Seeds
Do this after Body Round 14, with the inside of the body still accessible. For a starting placement, stitch the two eyes across Rounds 11–12, about six stitches apart, and center a small curved smile one or two rounds below them. Use removable markers to preview the expression before threading the needle.
Embroider short vertical dashes in white, staggering them across the top and sides. Leave some space around the face and the lower area where the arms will attach. Secure the threads inside the body, then return to Part 1 to finish crocheting and stuffing.
Part 5. Assemble the Strawberry Octopus
Position the eight arms in an even ring around the lower third of the body, using Rounds 16–18 as a starting area. Pin all eight in place, then set the octopus on a flat surface. Adjust the arms so the body sits evenly and the face stays centered above the front arms.
Sew each arm around its open edge through several body stitches. Center the leaf crown on top of the body and stitch around the green disc, leaving the leaf tips free. Secure and bury every yarn end, then check all eight arm seams and the crown for loose stitches.
How to Customize Your Strawberry Octopus

Use red for a classic strawberry or pale pink with cream seeds for a softer color palette. Try two small stitched cheek marks or swap round eyes for sleepy arcs. For a larger version, use thicker yarn and a hook that gives firm fabric. Make one arm first to check the proportions before crocheting the other seven.
Beginner Tips and Troubleshooting
| What you see | How to fix it |
|---|---|
| Stuffing shows through | Use a smaller hook for the next sample or remove a little fiberfill if the fabric is overstretched. |
| Body looks uneven | Count stitches after each increase and decrease round. Spread small tufts of stuffing evenly as you fill. |
| Arms sit at different heights | Check each arm has seven rounds, then pin all eight before sewing and set the octopus on a flat surface. |
| Crown puckers or leans | Pin the green disc flat and sew evenly around it without pulling the thread too tight. |
If you test the draft, record your yarn, hook, finished height and width, and any changes to the arm placement. A photo after Round 14 and another after assembly make it easier to compare the body shape and finished proportions.
Care
Follow the care instructions for the yarn you use. For light marks, gently spot-clean with a damp cloth, reshape the arms, and let the piece air-dry.
Frequently Asked Questions
Is this pattern suitable for beginners?
Yes, if you can work single crochet in the round, make increases and decreases, and sew pieces together. The leaves also use chain stitches, slip stitches, and half double crochet.
How long does it take to crochet?
The time varies with your yarn and experience. Allow a separate session for embroidering the face and sewing on all eight arms if you are new to amigurumi.
Can I use plush yarn?
Yes. Use a hook that gives a firm fabric and move your stitch marker at the start of every round. Crochet and pin one test arm first because plush yarn can change the proportions.
Can I sell finished octopuses?
Check the requirements that apply where you sell and consult your marketplace’s handmade-product rules before listing finished items.
Will my octopus match an AI illustration?
Treat any accompanying AI-generated illustration as color and styling inspiration. The round counts, yarn choices, tension, and assembly in this tutorial determine the shape of your finished piece.
Is this a baby toy?
This draft is intended as a decorative amigurumi. Its construction has yet to be tested for infant use.
Final Thoughts
Finish with a strawberry crown and the expression you like best. If you make another octopus, keep your notes on yarn, hook size, and where you attached the arms so you can repeat the shape or adjust it.